
 WhatsApp:
  Email:
How to Install an Outboard Propeller
Direct answer: Secure the outboard against accidental starting, install the correct forward thrust washer, slide the propeller and hub onto the splines, add the specified rear hardware, torque the propeller nut to the engine manufacturer's specification, and secure it with the required locking device or a new cotter pin. The hardware order and torque are not universal, so compare this guide and video with the manual for the exact engine and hub system.
Safety first: Shift into Neutral, switch the engine off, remove the emergency-stop lanyard or lock plate, and prevent accidental starting. Wear gloves and use a wood block or the method specified in the manual to stop the propeller from turning. Never rely on holding a sharp blade by hand while tightening the nut.
Before You Install the Propeller
Confirm the engine model, year, gearcase, propeller-shaft spline count, RH or LH rotation, hub system and hardware kit. A propeller that slides onto the shaft is not necessarily the correct fit. If the current size is unclear, read the propeller diameter and pitch markings before removing the old unit.
Inspect the shaft for fishing line, corrosion, damaged splines or a leaking propeller-shaft seal. Clean the splines and apply the marine grease specified by the engine manufacturer. Replace damaged washers, distorted locking hardware and used cotter pins.
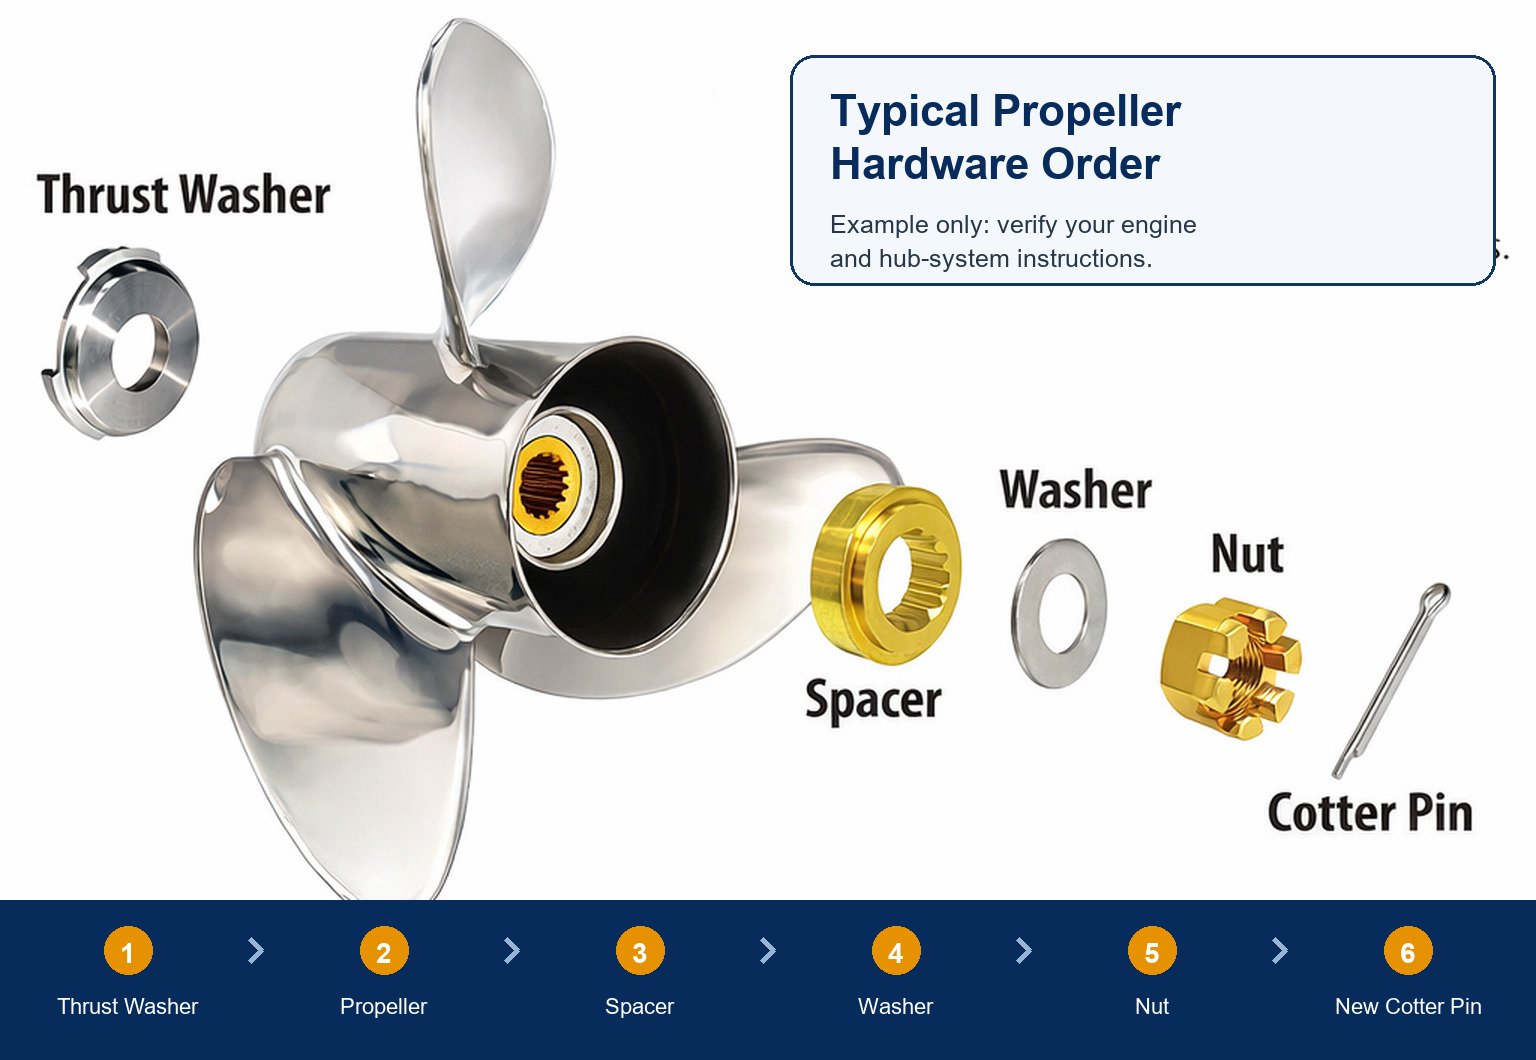
Typical Hardware Order
| Position | Typical component | What to verify |
|---|---|---|
| Gearcase side | Forward thrust washer, thrust hub or stopper | Correct face and taper toward the propeller |
| Center | Propeller with pressed-in or interchangeable hub | Correct spline, rotation and full seating |
| Outer side | Rear thrust washer, spacer or drive-sleeve adapter | Part sequence for the specific hub system |
| Retention | Flat washer, tab washer, locknut retainer or propeller nut | Specified nut and torque |
| Locking | New cotter pin or manufacturer-specific locking device | Correct alignment and secure engagement |
The video shows a forward thrust washer, propeller/hub assembly, rear hardware, flat washer, nut and cotter pin. Other outboards may use fewer parts, a drive-sleeve adapter, tab washer, locknut retainer or no cotter pin. Do not force the video's order onto a different system.
Step-by-Step Installation
- Make the engine safe. Keep the shift control in Neutral, disable ignition and remove the emergency-stop device. Support the tilted engine as directed by its manual.
- Clean and inspect the shaft. Remove old grease and fishing line. Check the seal area and splines, then apply the specified water-resistant marine grease.
- Install the forward thrust washer. Seat the correct washer, thrust hub or stopper in the required direction. Reversing this part can prevent the propeller from seating correctly.
- Slide on the propeller. Align the hub splines with the shaft and push the assembly fully inward without hammering it.
- Add the rear hardware. Install the spacer, rear thrust washer, drive-sleeve adapter, flat washer or retainer in the exact sequence shown for the engine and hub kit.
- Install and torque the nut. Block the propeller using the approved method and tighten with a torque wrench to the value in the owner's or service manual. There is no single torque value for every outboard.
- Secure the locking device. Where a castellated nut and cotter pin are used, align the nut with the shaft hole as the manual directs, insert a new cotter pin and bend its ends securely. Do not reuse a fatigued pin.
- Perform a final check. Remove the wood block, rotate the propeller by hand and confirm free movement, correct clearance and no loose hardware. Reinspect the installation after initial operation.
Common Installation Mistakes
- Using the wrong thrust washer or installing it backward.
- Mixing hardware from two hub systems.
- Guessing the nut torque or tightening without a torque wrench.
- Reusing a bent or corroded cotter pin.
- Installing an RH propeller on a counter-rotation gearcase, or the reverse.
- Ignoring fishing line behind the old propeller.
Video scope: This short video is a visual hardware-sequence demonstration. It is not a model-specific service manual and does not replace the engine manufacturer's installation procedure, torque specification or safety instructions.
Confirm the Propeller Before Installation
Use the Finder for a first-pass match, or send the engine model, year, current propeller marking and hardware photos to the Xspeed technical team.
Frequently Asked Questions
Can I install an outboard propeller myself?
Many owners can install a conventional single propeller if they have the correct manual, hardware and torque wrench. Dealer service is appropriate when the shaft, seal, hub system or required hardware is uncertain.
What torque should I use for the propeller nut?
Use the value specified for the exact outboard and hub system. Published torque values differ substantially between engines, so this article does not provide one universal number.
Can I reuse the cotter pin?
Use a new cotter pin when the design requires one. Yamaha's maintenance guidance specifically recommends replacing it rather than reusing the old pin.
Official References
- Yamaha Outboards: Propeller Maintenance Guide
- Mercury Marine owner's manual: propeller installation and cotter-pin alignment
- Suzuki Marine owner's manual: installation safety, grease, hardware and torque
Manufacturer names and trademarks belong to their respective owners. Xspeed products are aftermarket replacement products, not genuine OEM parts. Always follow the manual and safety instructions for the exact outboard, hub system and installation hardware.